Automated Airtable content calendar - Detailed Tutorial
If you wish to have any meaningful results from social media, you should be consistent. And the key to consistency is good planning. Well in order to plan your social media properly you will need a content calendar.
A good content calendar will give you a preview of your posts in the following weeks, and in this article, i’ll show you how to create an Airtable content calendar totally free and how to create an integration that will automatically post the content on social media at a scheduled time.
Let’s put your social media on autopilot!
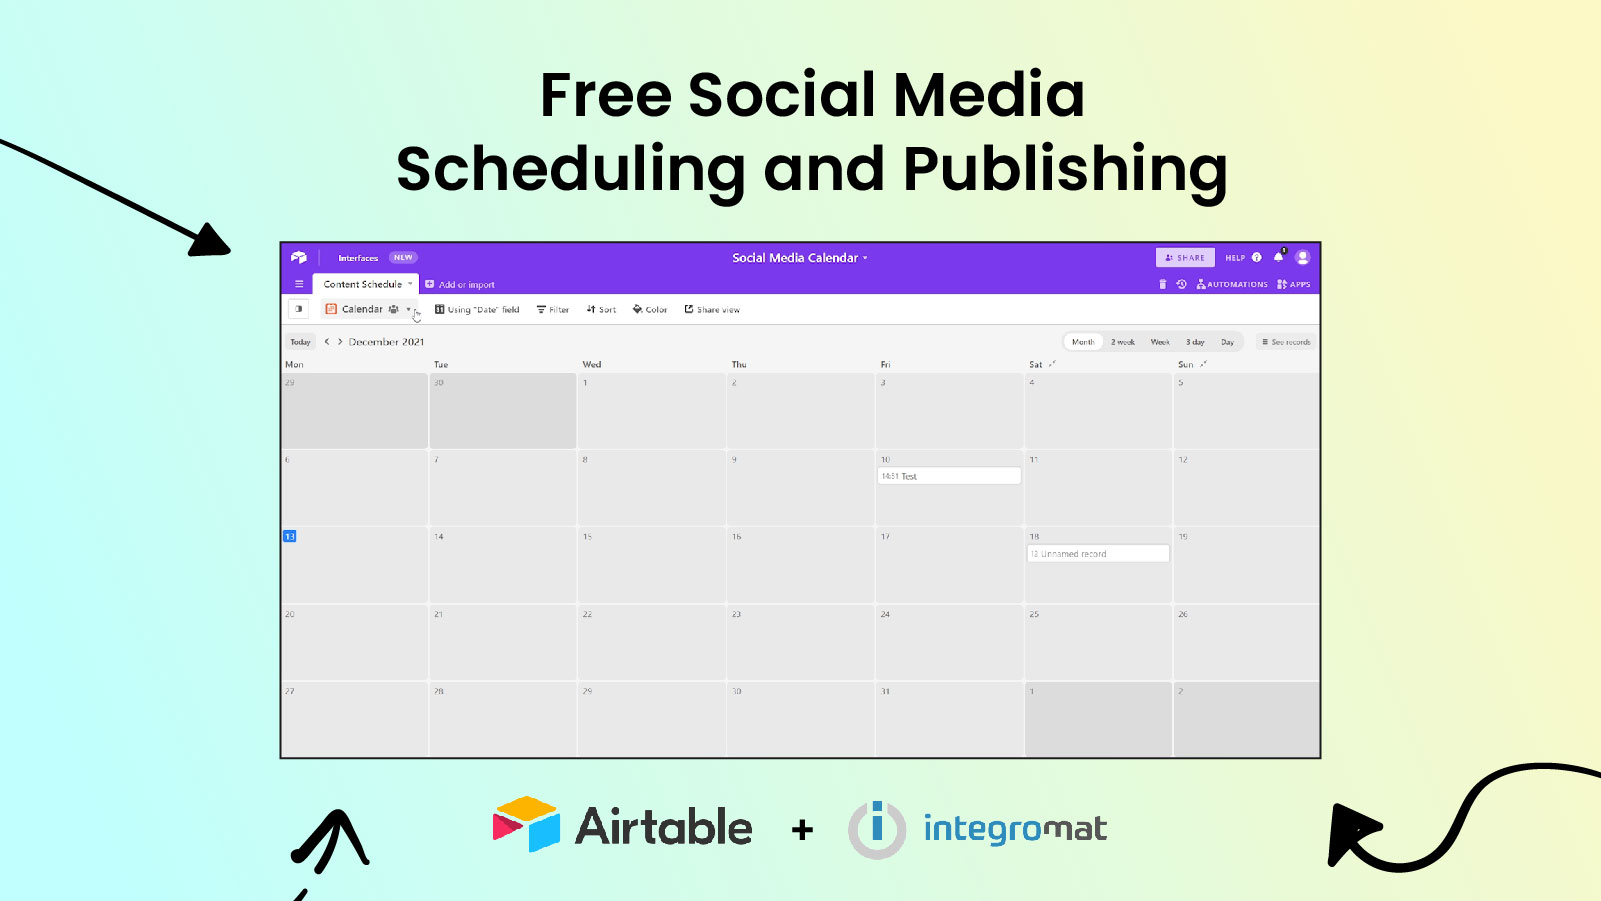
This Airtable content calendar will let you write copy, add hashtags, select topics, upload images, and best of all - it will actually post the content on the social media you select and at the time you choose.
Here’s how it works:
The beauty of this workflow is that it’s absolutely free, and when you compare it to other options the value is clear. Sure, it requires some time to set up but you will be saving hundreds of dollars, which you can invest in something more important.

How to design your Airtable content calendar
Setting up and designing this calendar is pretty easy in Airtable. Airtable even offers a template that you can use and edit to your liking, or you can create one from scratch. There is no wrong way.
I’ll skim over the designing part, as there are other good tutorials that are really detailed so pardon me if i skip something. My focus will be on the integration part (that will allow you to post these automatically) as i couldn’t find a tutorial covering this.
Using a template
If you want to use a pre-made template that Airtable offers here’s what you need to do:
- Open up your Airtable Dashboard
- Click on the “Add a base” button
- On the sidebar on the right, search for “Social Media Calendar”
- Click on the first result
That’s it! Airtable will now populate the table on the left with the template. As you can see it’s pretty complex and it has a lot of options. They really designed this well. You can now edit this as you wish.
My version of the Airtable content calendar is a bit simpler. I don’t need all of the analytics and options but on the other hand it will have the automated posting feature.
You could also create the integration for this template though.
If you need all of the options that this template offers than i encourage you to read this article to the end, learn how to create the integration, and then apply the learnings to the Airtable template.
It will work pretty much the same, it’s just this one will have more fields.
Creating from scratch
In order to create this calendar from the scratch, do this:
- Open up your Airtable Dashboard
- Click on the “Add a base” button
- After you get a blank base, name it.
- You can delete all of the fields (except the first one), so you can start adding yours.
- You can now start adding the fields you need. My calendar has: topic, copy, content, channels, date, and status.
- I’ll rename the first field to “topic” as this can’t be deleted, and after that, I can start adding the other fields.
- To do this, simply click on the + sign, and add a field type you want.
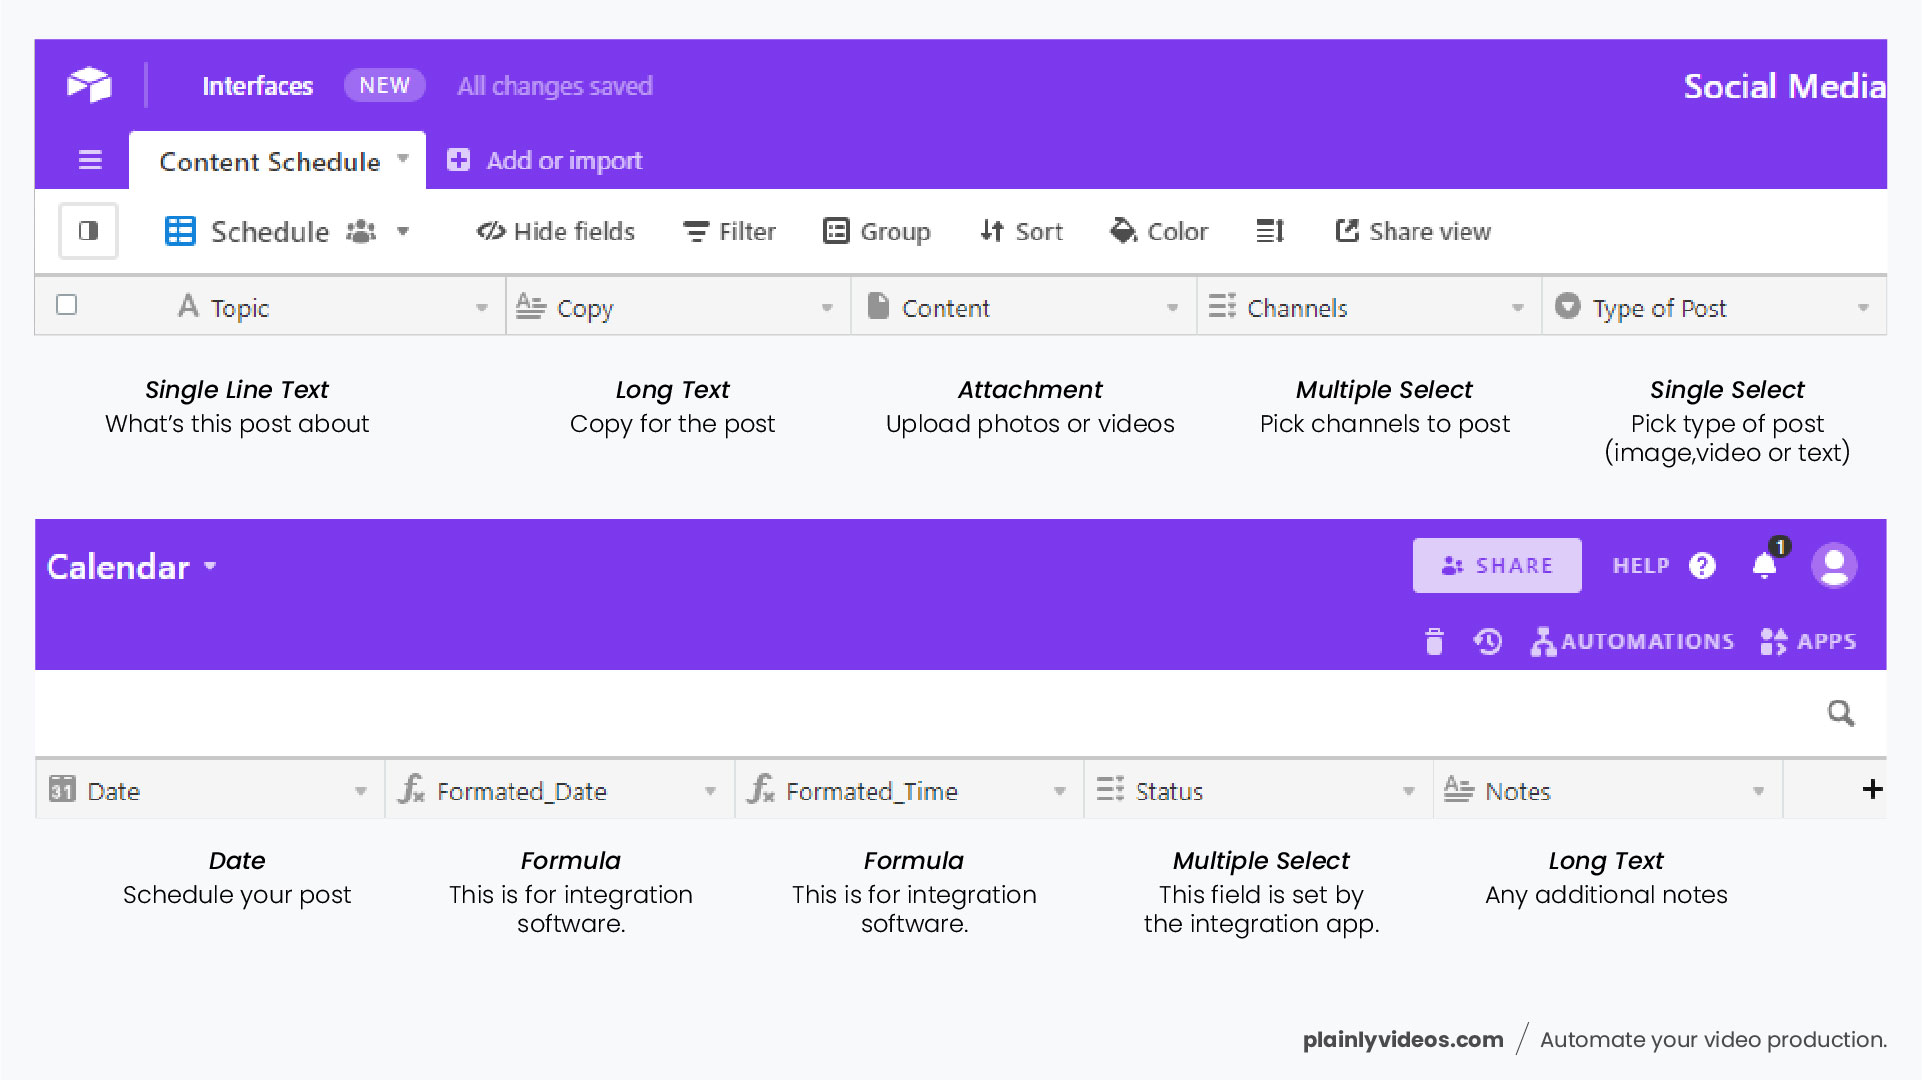
- With the fields done, I also want to add one more “View”, this View will be a calendar view and it will allow me to see the schedule in a calendar format which will give me a quick overview of all of the posts.
- To add a new view, hover over the “Grid View” in the top left, wait for the sidebar to open, and click on the “Calendar” at the bottom.
You will notice that we have two weird fields, those are Formated_Time and Date. These are mandatory because they allow the integration tool to check the date/time for which you scheduled the post against the current date.
If you don’t set up these fields, then you won’t be able to have the automated posting feature.
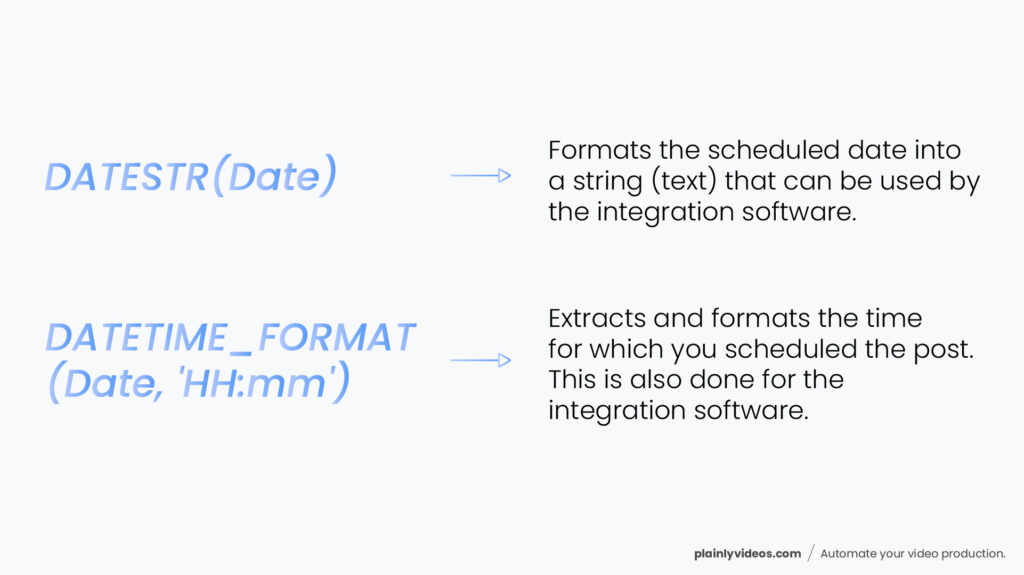
And the formulas that go into these fields are:
DATESTR(Date) - For Formated Date
DATETIME_FORMAT(Date, 'HH:mm') - For Formated Time
Nice! Our calendar is done now. Of course, you can always add more fields if you need them, but I think this has everything we need. You even borrow some fields from the template that Airtable offers.
Automating your Airtable content calendar
Here’s where come to the exciting stuff! In this section, i’ll show you how to set up automation using an integration tool called Integromat that will automatically publish your posts on social media at scheduled times!
You can also use Zapier to do this, but i find that Integromat has a more generous free plan, and even if you upgrade it’s only $9 per month so it’s a really good price.
Here’s how the integration looks inside of Integromat:
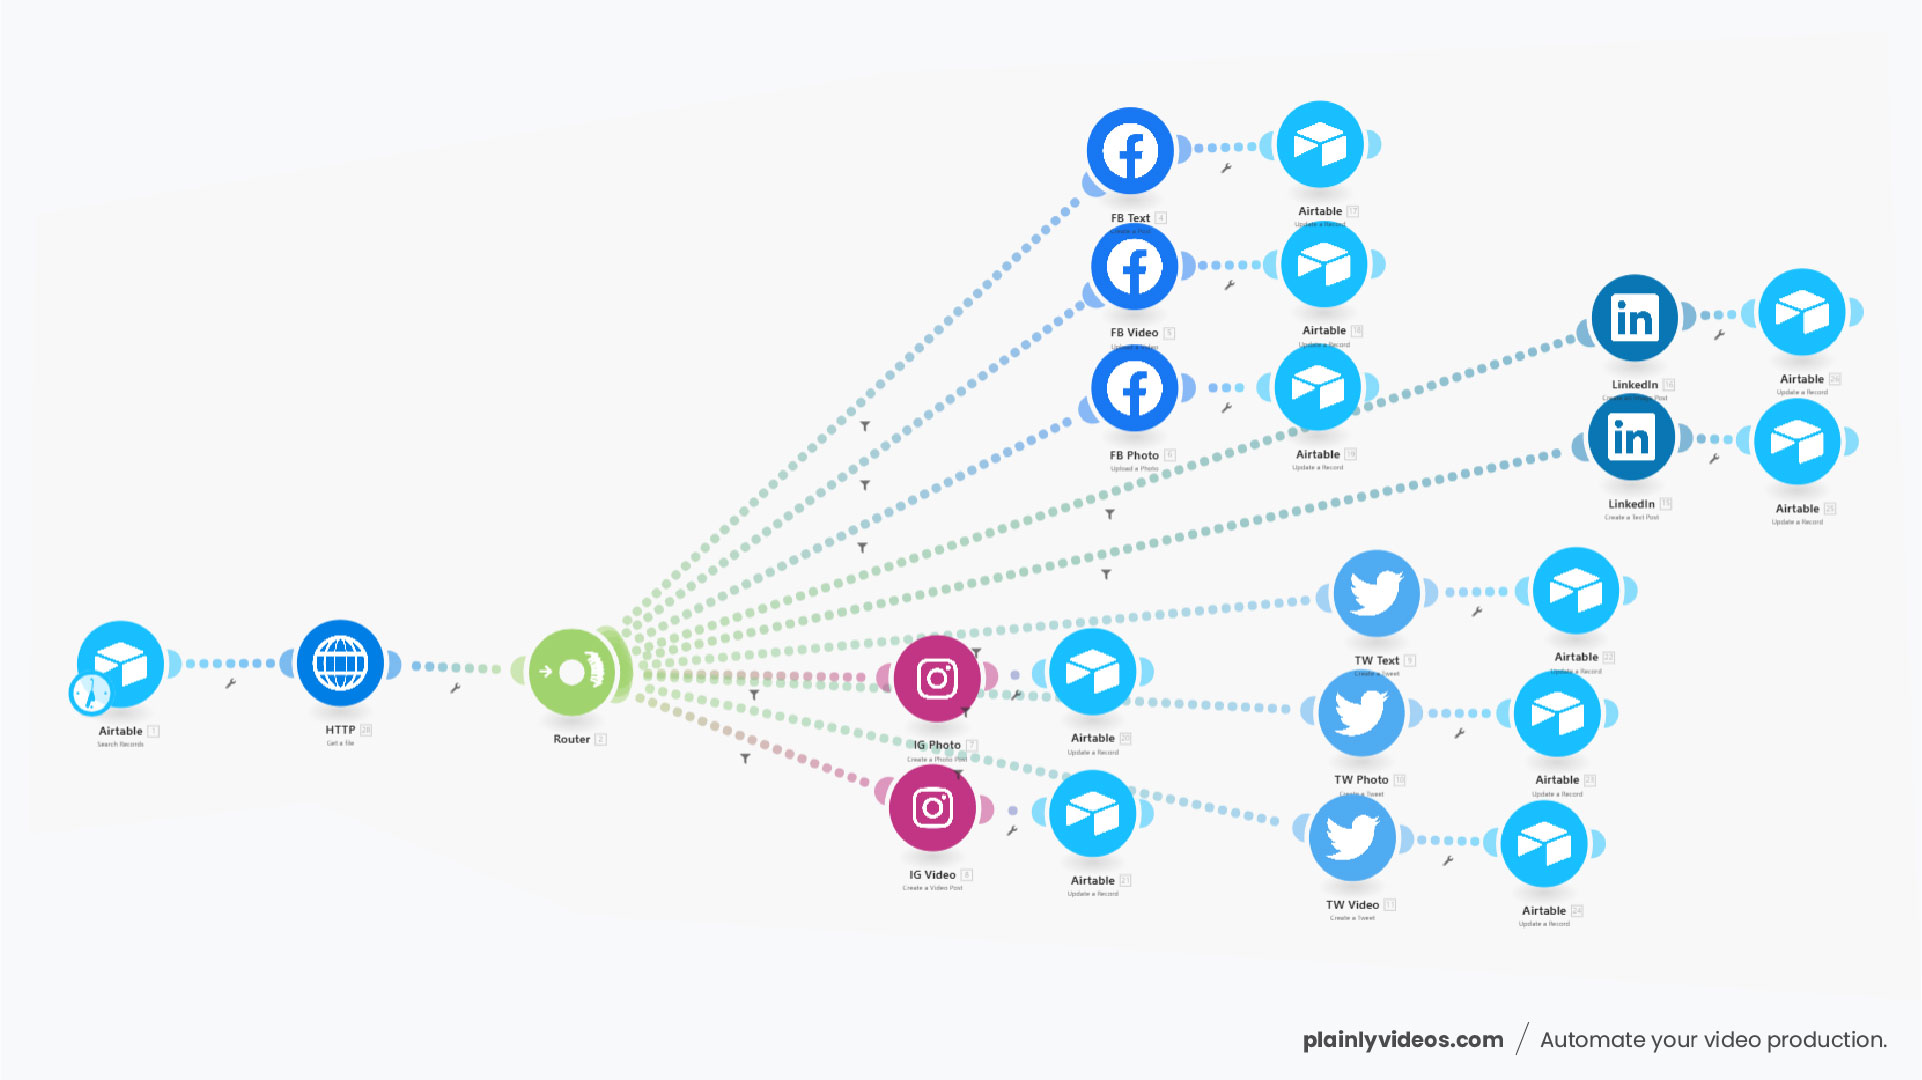
It’s not as complicated as it looks, i swear. Creating this integration took 15 minutes.
Sidenote, at the bottom of this section there is a video tutorial. In the video, i explain this integration in great detail and i show you what to write in each field…so if you are a visual learner you should check that.
Integration Set-Up
Airtable
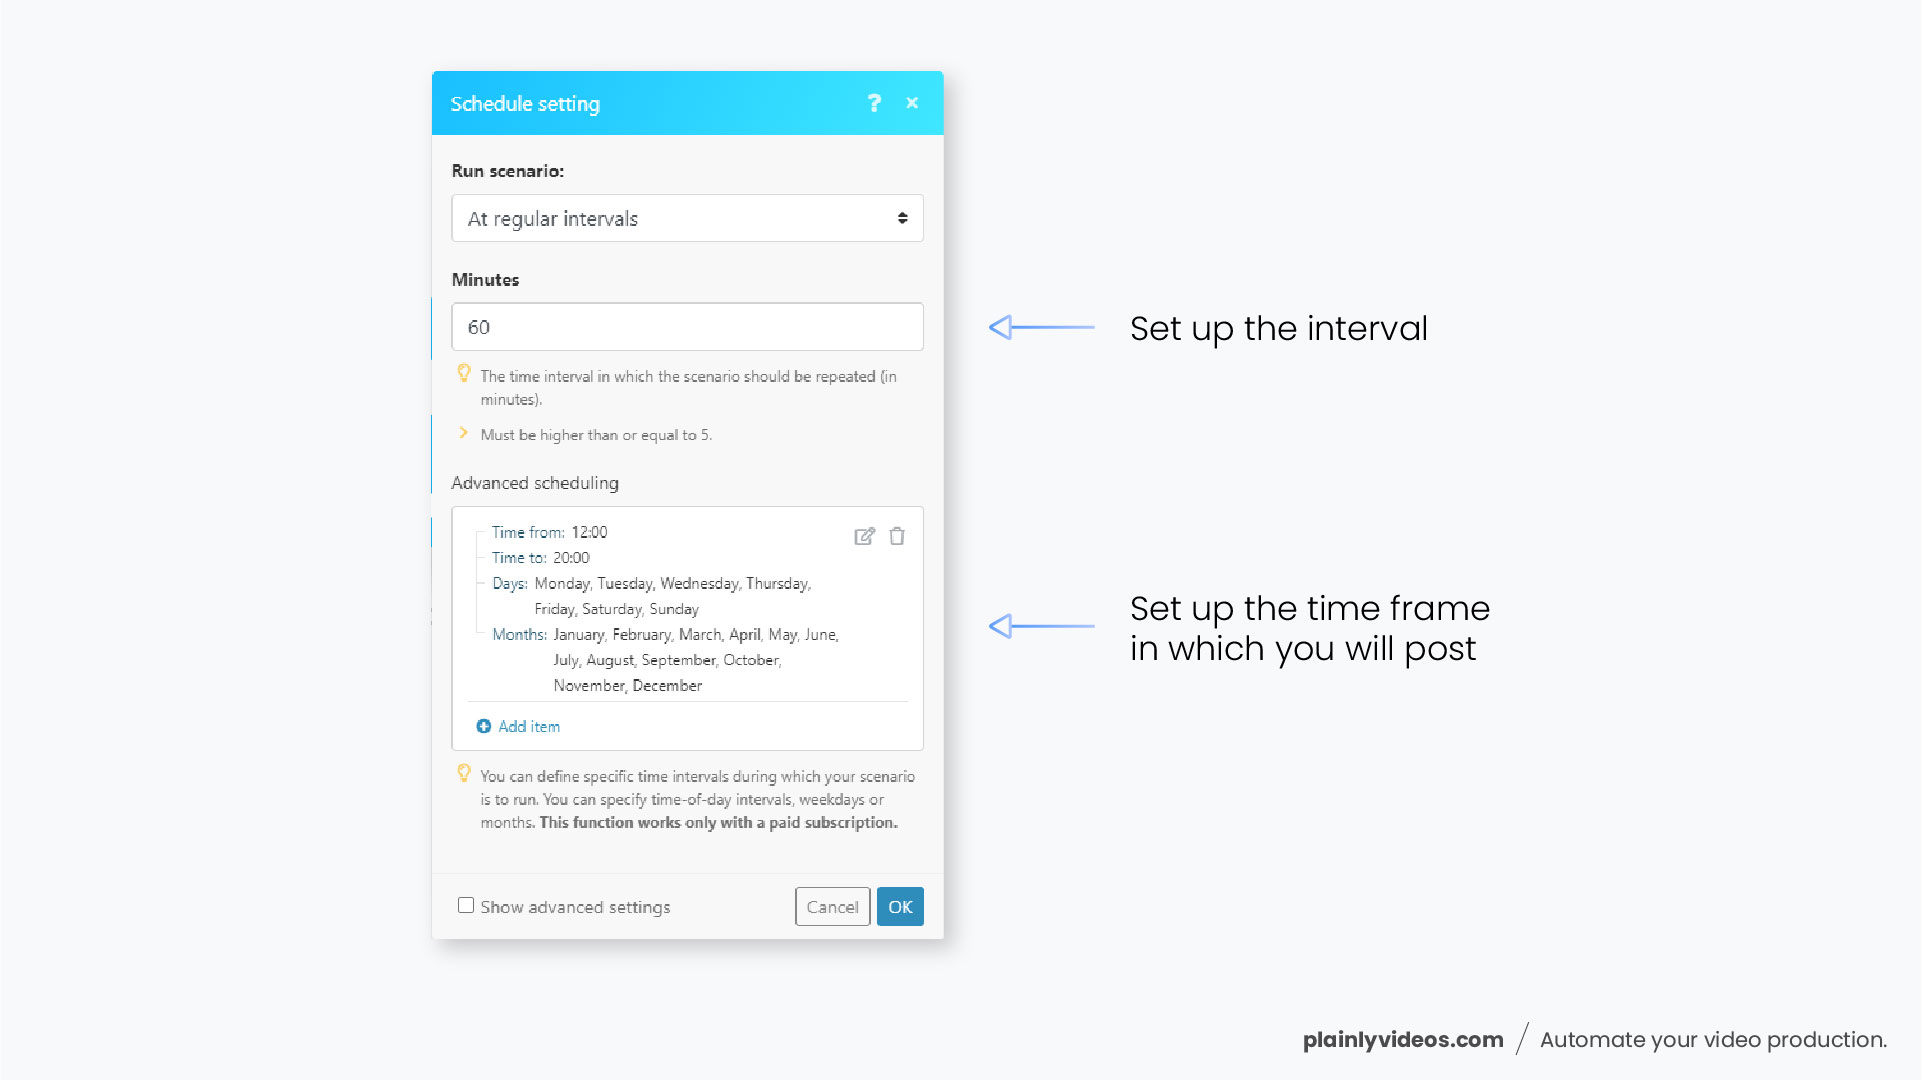
This integration works on a time interval. The first module checks all of the records at a regular interval. This interval is up to you, but i set it up so it checks every 60 minutes in a period from 12:00 to 20:00, because i know that i won’t publish anything before noon, and after 20:00h.
You can set this up however you wish, but bear in mind that if you are using the free plan, you have to pay attention to the operations count. Every time when Integromat checks if there are new posts scheduled, that’s 1 operation.
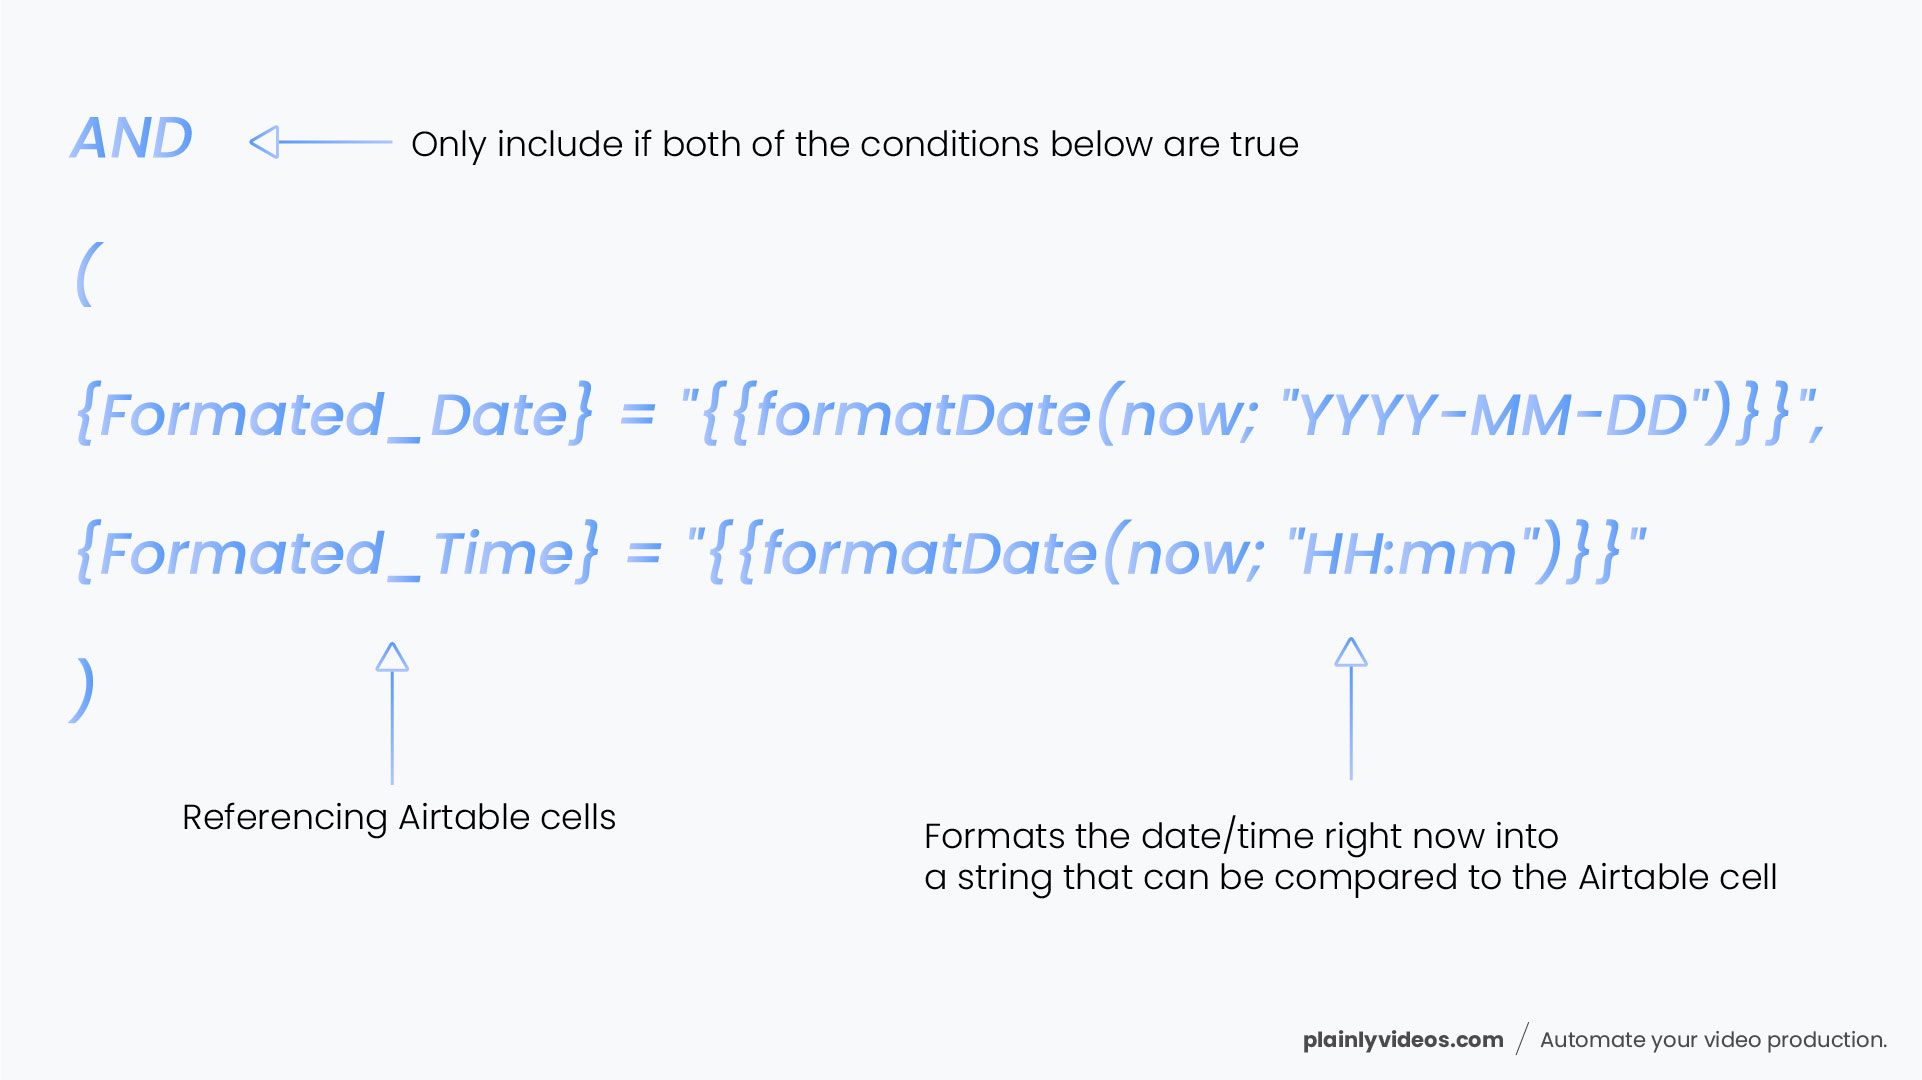
Every time when it checks Airtable, Integromat will run all of the existing records against a formula and if any of the records match the formula it will return that record. This formula simply checks if the scheduled date matches today’s date.
If it does, it runs the integration and posts the content.
The formula is:
AND(
{Formated_Date} = "{{formatDate(now; "YYYY-MM-DD")}}",
{Formated_Time} = "{{formatDate(now; "HH:mm")}}"
)
After setting up this module, we’ll add a router, and then then the publishing part comes.
Filters
You will notice that instead of just 4 modules, each for separate social media, we actually have 10. This is because you have to create a module for each post type and each social media. This is where the “Type of Post” and “Channel” fields and filters come in.
Type of Post field in your Airtable content calendar is meant to tell the integration tool what kind of post did you schedule. It’s the same for the Channel field, that one tells the filter in the integration tool to which social media should the post go.
Filters are set up between the router and the specific social media module. They exist so Integromat can know what kind of post you scheduled, and where to post it.
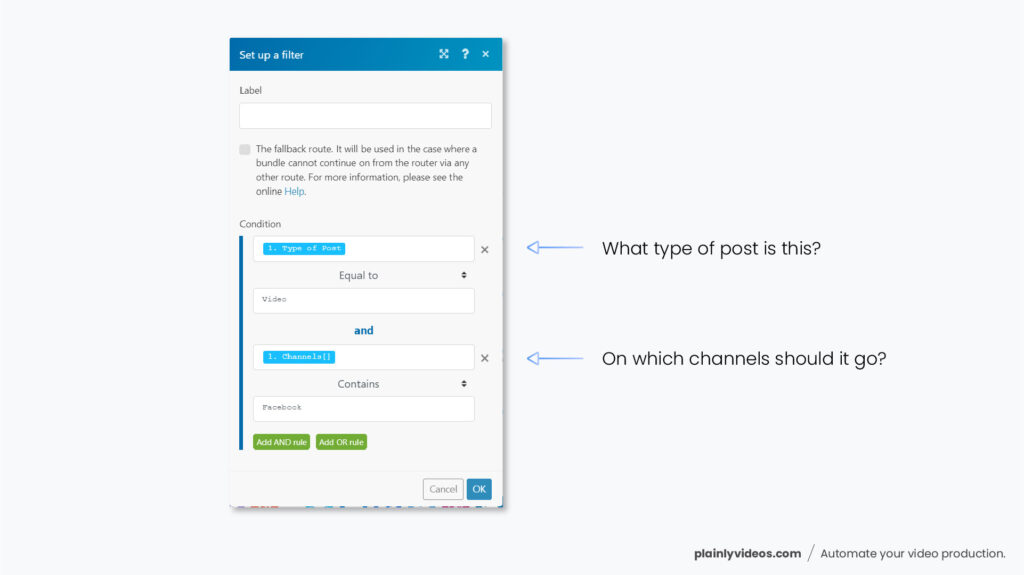
There are two filters that are applied between modules. The “Channel” filter, and the “Type of post” filter.
The format is the same for all of them, you just change the values.
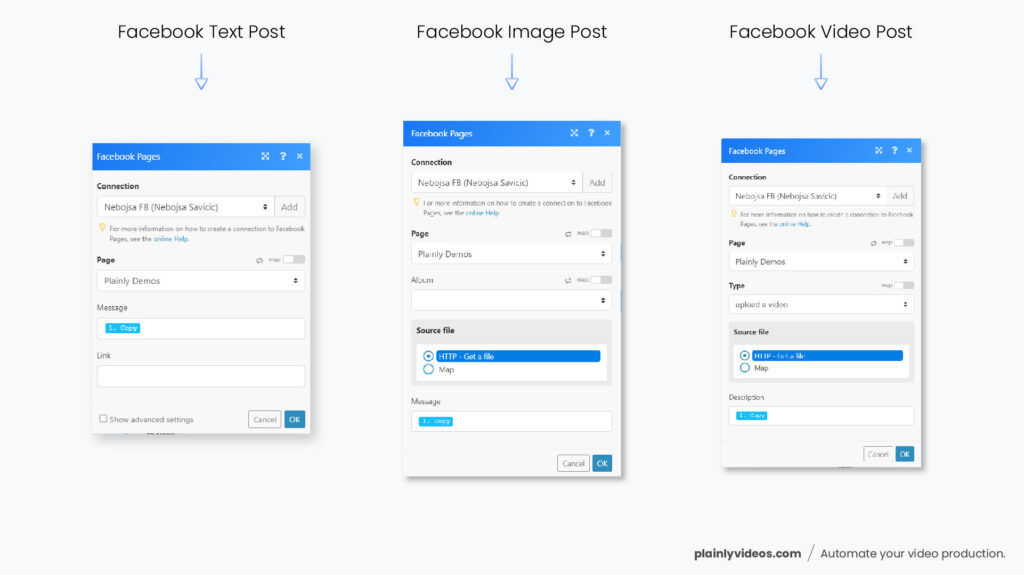
There are 3 modules you need for Facebook (Text, Photo, Video). Each medium has to have its own module because that’s just how Integromat and these modules work.
The first step is to connect your Facebook Page to Integromat. These work only for Facebook pages, and there isn’t a way to do this for your personal profile.
After you connect, the only thing left to do is to map the data to Airtable. You can check the video below for a detailed explanation of what goes where.
One thing i’ll note is that you should be careful when mapping the data and you should make sure that you are mapping the URL of the file and not just the general content field.
After each Facebook module, you should put an Airtable / Update a record module which will go back to the Airtable sheet and set the status of the record to “Posted FB”. In this module, just pull the Airtable Record ID from the first module, and the only thing you need to modify is the “Status” column at the bottom.
We’ll do this for each social media, so you can have a clear overview of what was posted and what wasn’t.
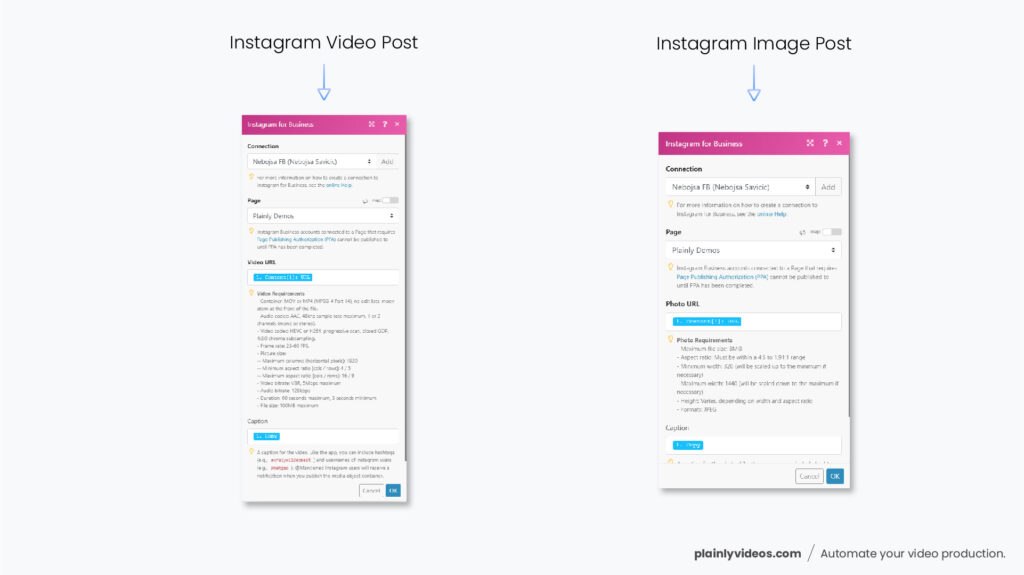
Instagram works the same as Facebook. This can only be done for business profiles, and you have to create two modules, one for photos and one for videos.
It’s also pretty simple to set it up. Just map the data to Airtable, make sure that you are mapping the correct fields (for example Content: URL and not just Content:).
Don’t forget to add the Airtable modules after each Instagram module that will set the status of the record to “Posted IG”.
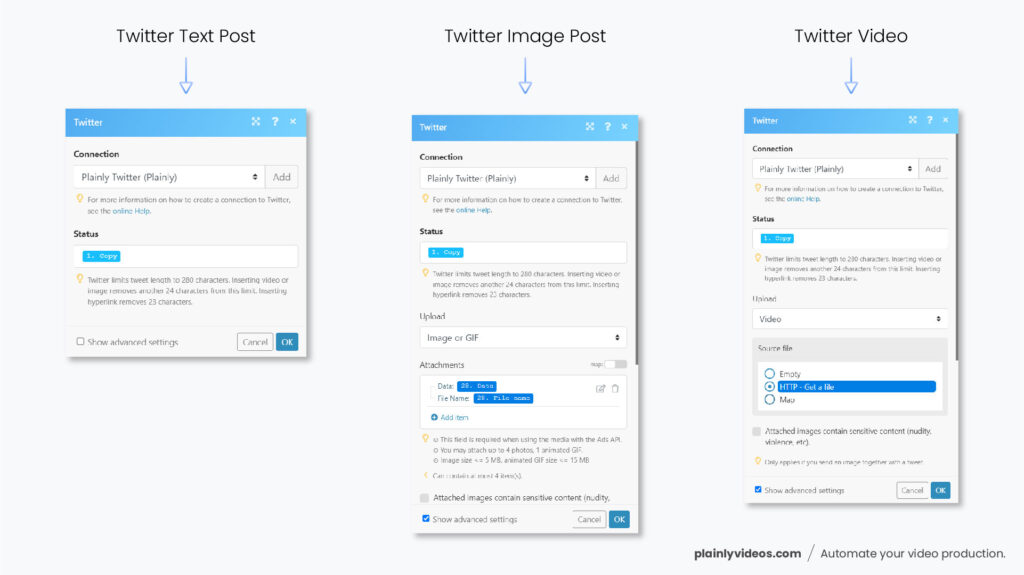
Twitter is no different. Create 3 modules, one for each medium, and map the data from Airtable while being careful that you are mapping the right things.
If you feel lost in any moment of this tutorial, refer to the video below where i talk you through the integration step by step, detail by detail.
As was the case with Facebook and Instagram, don’t forget to add the Airtable module after each Twitter module which will go back to your Airtable content calendar and set the status of the record to “Posted TW”
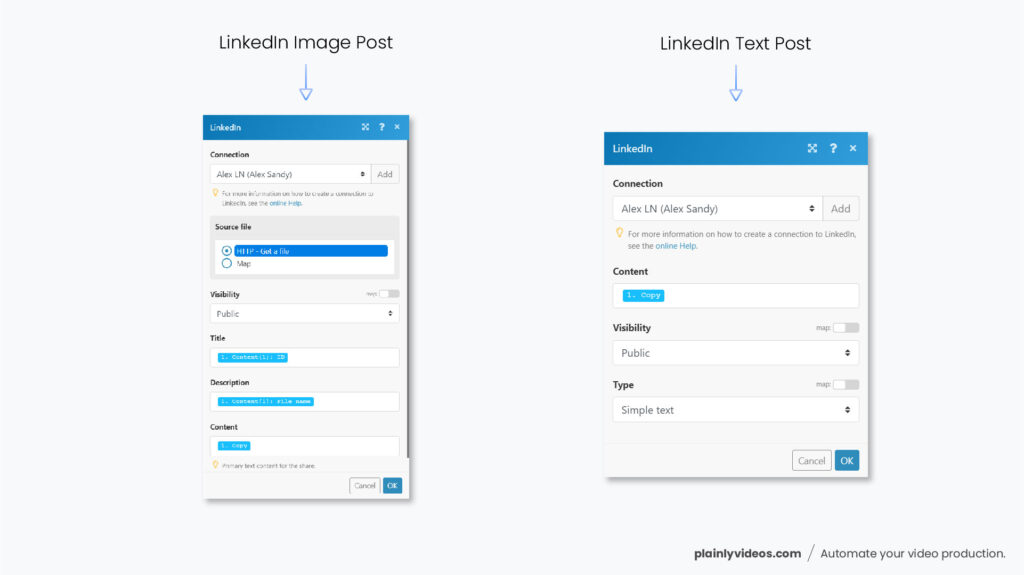
I know i know, nobody likes LinkedIn but you can’t avoid it. On the bright side, setting up the automatic publishing works the same as above.
LinkedIn right now doesn’t support integrations for videos, so you will have to settle just for photo and text posts. Create two modules for these mediums and map the data from your content calendar.
I had to figure out what fields should go in “Title” and “Description” fields for the image post, but since these aren’t seen anywhere you can just put the ID and FileName from Airtable.
As with the above, don’t forget to add the Airtable module which will go back to the content schedule and mark the post that was just uploaded as “Posted LN”.
Video Explanation
Closing Words
Setting up this automated content calendar can be a great alternative to any other social media scheduling tool. Sure, it requires some work but this workflow can pretty much be done for free.
And the work part isn’t that hard in my honest opinion. Setting this up can take around an hour or so, just follow the tutorial and watch the video i created above. You can literally copy everything i did, and get set up quickly.
There is a lot more upgrade possibilities to this workflow, you could add a bunch of cool modules, and even AI that could write the copy for you.
In some cases, you could even have content (like videos) generated automatically, we wrote a few tutorials on that. For example, we created a workflow where a video will automatically be created whenever you write a blog post. Read about that here!
The world of no-code is magical.
That’s why we created a no-code video generation platform that allows you to set up integrations quickly and generate 1000s of videos in a matter of minutes. It’s called Plainly, and you can book a 15-minute demo to see how it works on the link below.
Book a demo here.
If you have any troubles with creating this Airtable content calendar, feel free to reach out at contact@plainlyvideos.com and we’ll be happy to help you.
Thank you for your time.


